Thursday 27 February 2014

Graphic Design - Week 04

Session 1

The fourth week was the first time our work was not drawn concept, rather it was to use photoshop for the first time, and to use blah when designing. We began by finding 3 images online, and then cropping the images twice, to create one good and one bad crop of the image that does/ doesn't follow the rules of imagery.

Here are the results.

1.

Original
Bad Crop
Good Crop
 2.
Original
Bad Crop
Good Crop
 3.
Original
Bad Crop
Good Crop
I feel like my work on this is good. I feel like I do have more to learn and understand about composition. But feel like I have made a good start.

Session 2

In the second session we focused on abstract composition. Given a group of words we were to create 8 abstract images using simple black shapes to show the word chosen. Here are mine.

Weight

Direction

Negative Space

Order

Perspective

Scale

Symmetry

Tension

Although simple. I believe each image reflects the word chosen, and that Ive filled the learning specifications for this week.

Wednesday 26 February 2014

Video Editing - Week 04

This week the work was colour rendering. Basically to get a clip, and get rid of all colour except one. Here is my attempt.


I feel the music only furthers the sex appeal, but to each their own I guess...

I feel the exercise went well. Although the red would disappear at the end on my first attempt, this was due to me not having widening the colour spectrum displayed. After increasing it the video came out better, with a brighter red.

Workshop - Sculpting Session 01

For the first workshop session, we were introduced to Scupltris. A free virtual sculpting software. At first it seemed slightly daunting, but then seeing how simple and easy it is to sculpt something on it (after a thorough introduction) was much more comfortable to use.

With a step by step guide from our tutor, we sculpted a dragon/dinosaur head of some sort. Here is what I had at the end of the session.


I am very happy with what I've created, although if you were to ask me to replicate it from scratch, I probably couldn't, as it was mostly trial and error that led to this design. I did miss out one or two steps, mainly the tongue creation, although I did create it, I think I did it in the same layer(?) as the eyes, so when Id try to stretch it, the eyes would move as well.

Tonight I installed the software and attempted to finish the body, Here is what I have


I'm not too keen on it. I had envisioned it having wings, or atleast look more reptilian.Theres also a few problems with the sculpt, the legs joints especially. I also had a go at the hands, which I think look a little ridiculous, and couldnt get the leg claws down. But with more practice ill be able to do it.

Monday 24 February 2014

Self Initiated Work - Brief

For a while now, I have had an idea for a piece of work I wanted to do in my spare time, and feel I now have enough time and energy to invest into it.

The brief Ive initated for myself, is to create a detailed full body design of a bionic humanoid, which Id draw digitally. Using perspective photos of my limbs to experiment and prepare with, the final result would be a design for a humanoid shape, aswell as a design for an outer  'battle mech' suit, which the bionic humanoid could fit into, and operate. The main focus of the bionic design is to show equal part man and machine, and the combination and co operation of machinery and flesh. While the Battle mech will be completely robotic, with no biological or living parts. Although I may experiment with creating a 'living' mech, but it will be in addition to the main 2 designs the brief focuses on.

Hopefully by the end of this brief, Ill have created a realistic and practical design for a bionic humanoid, aswell as a battle mech to accompany it.

Thursday 20 February 2014

Graphic Design - Week 03

This weeks goal was to design 4 concepts for human - animal hybrid heads. There werent any more specifications to the brief, just that the designs had to have equal attributes of both human and the chosen animal.

Here are my designs from both sessions:

Armadillo -

Praying Mantis -

Koala Bear -

Squid -

I'm happy with my designs. I feel like some could use a little improvement. The Koala hybrid's neck should be thicker, as it looks quite weak and fragile in comparison to the size of the head. Same for the armadillo design. But overall I feel like I've successfully manage to combine attributes of both species to create a realistic hybrid.

Wednesday 19 February 2014

Video Editing - Week 03

This week the aim was to create a short clip using split screen on Final Cut Pro. We watched our tutors example, and then an online tutorial. The basics for it are quite simple, as long as the footage is good, the effect should come out nicely.

We set out and were going to film one person walking between 2 poles, but by luck a bus passed by, and so we recorded that. I'm quite pleased that we got footage of something so different.


The problem with the video is that the second footage I split into the middle, has a sun flare that is quite noticable on the grass. The camera also moved at the end, but I cropped it out and so is not in the final clip.

Thursday 13 February 2014

Graphic Design - Week 02

This week the aim to create 2 vehicle designs. One aerial, and one land.

For the aerial vehicle, the brief was to create a small aerial scout vehicle, which had 2 engines and a door. My immediate thought was to create something similar to the scout vehicles in the Halo franchise, the UNSC 'Hornet'. I also took inspiration from google searches of personal submarines. Although they are not aerial, they must still be streamlined for water resistance, just as planes must be against air resistance.


Here is my design.


I am happy with the design. I decided to the pilot's view 'bubble', from where he operates the vehicle, to act as the door to the vehicle aswell, which can be opened and closed, aswell as a protective casing that can be lowered over the bubble to defend against solar flares or other damage. I feel the width of the design in the top view is a little bit more than I originally intended, but feel it is suitable and necessary for the small size of the ship, which still has to accommodate a pilot, 2 engines and storage in the back.


For my land vehicle I knew I would create a 2 track vehicle, with a front screen similar to that of a combine harvester. I took other inspiration from tanks and armoured vehicles that were found on google. I began my creating a rough idea of what I wanted. Once I settled on this design and working out the details, I began drawing it on the 4 viewpoint sheet.


Im content with my design. I feel like the mechanical arm on the side could be improved, maybe give more thought into how it would rotate and move, adding some sketches to show this. But other than that I am pleased with the design. I could add more techincal panels, radars and antennas on the roof to better show it as a research vehicle, but I think that would be a bit of an overkill and unrealistic. It has an antenna and small satellite, which I think is appealing.

3D Graphics - Week 02

This week we learned about the material panel and modifier.

It was a bit confusing in the first session, I felt like I was just trying to keep up with moving through the material window, But eventually I began to make sense and Im now able to use it efficiently.


 The image above is just a bitmap of a jpeg put on the plane. After this we added bump and specular to the material to create the lower images.


 Here is a 'final' render of the exercise that day.


I am happy with the work I've created. I feel confident that I can use and modify materials to create the look and feel of the materials I will need for my objects.

Wednesday 12 February 2014

Video Editing - Week 02

This week in video editing we looked at coding when rendering and exporting videos in Final Cut Pro. The goal this week was to create an exel spreadsheet report, documenting elements of the various coding we exported. This week we were to record 10 different encoding and document them in the spreadsheet. This is what my report currently looks like (12/02/14).


As you can see the render time and file size of the codecs vary greatly, even though it was the same 29 second video which was being exported. Some codecs are better that others, for example JPEG had a faster render time and image quality than DV-PAL, and is nearly half the file size.

Although I have included 10 codecs, I will be returning to this report and continuous adding to it as I progress through the semester, to better my understanding and confidence in which codec I should be exporting my work in, both now in university, and in my future career.

Thursday 6 February 2014

Graphic Design - Week 01

Session 1

This week, the work was relatively straight forward. Create 2 costume designs for a male and female body template.

For the male I decided to go with a gladiator/mercenary outfit. I took inspiration for armour and weaponry from what I saw in the 2004 film Troy, aswell as the tv show Spartacus: Blood & Sand and the video game The Witcher 2: Assassin of Kings. I also got some ideas from a google search of leather armour, to get an idea of the shape and design of leather armour.


I am quite happy with the design.


The only guidance we were given was to create a design that would be practical and realistic. As I have researched and been inspired from historical films, shows and media, which must be as realistic as possible, I feel confident that my final design would be practical in the (Roman) time period. Although some may argue the shield is not appropriate. To them I would say the roman games would make use of other countries' and culture's weapons and armour to recreate historical battles. Aswell, Mercenaries would often scavenge what could be gathered from battles for their own.

Session 2

For the female, I went for a futuristic design. Taking inspiration from 'Kat- B320' in the video game 'Halo Reach'. Also remembering scenes from the Terminator franchise. I set about to create a similar design.


Here is my design.


Although I cant say how realistic this is, since the technology in this futuristic design doesn't exist yet. But I feel it could be possibly invented in the near distant future. I also designed a primary and secondary firearm, which are inspired by the TAR-21 and ACR assault weapon.

3D Graphics - Week 01 (Session 02)

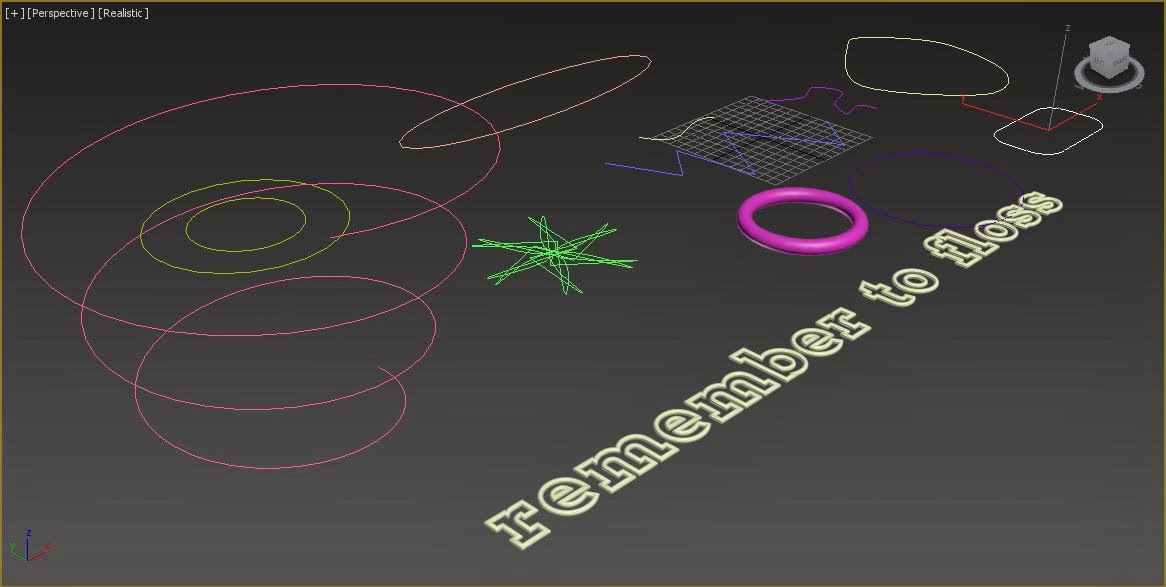
Today we continued on from where we left odd last session. But this time we focused on using 2D lines, found under the splines tab.

We began with just drawing lines, mixing between sharp and smoother/curved corners, learning how we could use the mouse to swap between both. We then loved to bringing the lines together, to create a unified shape and space.


We then experimented with other lines that can be created from the splines option, including text.


We then learned how to create 3D shapes out of the line using the 'lathe' option in the modify list. Aswell as adding other option to the modify list, as you can see from the image below there is a curve modifier added.


Following this small activity, we continued using the lathe option, creating shapes from lines to the shape and width of other splines. Aswell as creating point in the line where the shape would change to another spline, to create these images.


With this you can create much more intricate shapes, such as columns for example, by increasing the second radius of a star before the lathe tool.

We also created basic objects using this tool. Creating a line shape in the front viewpoint. In my example, the object I intended to create was a bowl, therefore I created half of the shape, and then adding the lathe tool. After changing the direction to 'Y', and the alignment to 'Max', the object took form. Clicking the option 'Flip Normals' the object then came out nicely rendered. I also made a champagne glass to go with the bowl, to experiment with a different shape. One thing that needed to be remembered was to make sure the two end point of the line are parallel, or there will be a small hole through the middle.

Wednesday 5 February 2014

Video Editing - Week 01

The first session began on a slightly awkward note, as I was not in attendance when we were told we needed to film a few scenes introducing the student hub in the Headingley campus, to be used in the session today. Luckily I was able to get a copy of the scenes a group has gathered.

This was my first time using Final Cut Pro. but I have used other video editing programs before, mainly After Effects, so it wasn't completely alien to me. We also had an on screen demonstration of how to complete this weeks task. 


I believe the video came out fine, except that it would glitch and turn to a black/grey screen when the text would appear. Another student had the same problem, and there was no indication or reason it should glitch at the text scenes. Then when put on youtube the entire video turns to grey screen for some reason.

Update

I went back and had another go at exporting the video. I simplified the video in the hopes it wouldn't glitch or have a black screen once rendered. Here it is. 


Again, for some reason, the minute I attempt to upload it anywhere, the screen will go grey. Not entirely sure why, as scenes I've exported the exact same way have come out fine. This seems to be the missing link (pun unintended). But as the first video shows (aside from the glitching, I know how to add captions to video, cut and mix video clips and audio, and how to export them.

3D Graphics - Week 01 (Session 01)

The first activity we did on 3ds Max, was getting use to the layout of the program. As this was my first time using 3ds Max, the 4 viewpoint layout was a bit intimidating, but after working through each, their uses and option, aswell as the purpose of the 8 buttons in the bottom left corner.


Once we had familiarized ourselves with this, we experiment with the standrad primitive options available, and told to create around 6 different shapes on the same plain.


Once we had done this, we moved on to modifying the standard primitives using the modify tab.


With the modify tab, we could change the shape and size of the objects to add some complexity to them, aswell as to make them to a precise measurements, something that will be a necessity further in the semester.